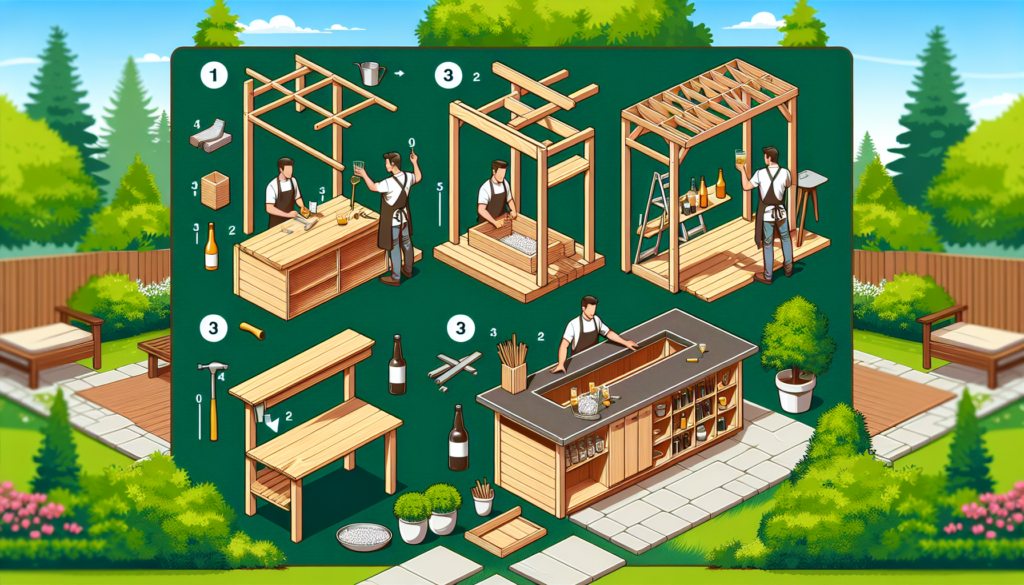
So, you’re interested in making your own wooden outdoor bar, huh? Well, you’ve come to the right place! In this article, we’ll explore all the steps and materials needed to bring your backyard dreams to life. From choosing the perfect wood to assembling and finishing your bar, we’ve got you covered. And hey, while we’re at it, how about some ideas for a wooden jigsaw puzzle? Sounds like a fun project to complement your new outdoor hangout spot! So grab a cup of coffee, take a seat, and let’s get started on this exciting woodworking adventure.
Choosing the Right Wood
When it comes to building an outdoor bar, choosing the right wood is crucial. You want to select a type of wood that can withstand the harsh outdoor elements and provide durability for years to come. There are a few important considerations to keep in mind when selecting your wood.
Considerations for Outdoor Use
First and foremost, you’ll want to consider the wood’s ability to resist decay and rot. Look for a wood species that is naturally resistant to moisture, such as cedar or redwood. These types of wood contain natural oils and resins that make them more resistant to water damage and insect infestation. Another important factor to consider is the wood’s durability. Opt for a hardwood like teak or ipe, which are known for their strength and durability in outdoor settings.
Recommended Types of Wood
While different types of wood can be used to build an outdoor bar, there are a few popular choices that are well-suited for this purpose. Cedar is a top choice due to its natural resistance to decay and insects. It also has a beautiful reddish-brown appearance that adds warmth and character to any outdoor space. Redwood is another excellent option that shares similar qualities with cedar. It has natural oils that help protect it against decay and insects. Teak is a highly durable hardwood that is commonly used for outdoor furniture due to its natural resistance to water, rot, and pests. Lastly, pressure-treated pine can be a more budget-friendly option that has been chemically treated to resist decay and insects.
Sourcing Wood
Now that you have an idea of the type of wood you want to use, it’s time to source it. You have a few options when it comes to obtaining the wood for your outdoor bar. Local home improvement stores often carry a variety of wood species suitable for outdoor use. They can provide guidance on the best wood for your specific needs and may even offer cutting services to save you time and effort. Alternatively, you can also consider purchasing wood from specialty lumberyards or online suppliers that specialize in outdoor wood. These sources may have a wider range of wood species and finishes to choose from, allowing you to customize your bar to your preference.
Designing the Bar
Once you’ve chosen the right wood for your outdoor bar, it’s time to move on to the next step: designing the bar itself. Designing your bar involves determining the size and shape, considering practical features, and incorporating storage and shelving options.

Determining the Size and Shape
Before diving into the details of your bar design, it’s important to consider the size and shape that will work best for your outdoor space. Measure the area where you plan to place the bar and take note of any existing features or obstacles that need to be considered. Depending on the available space and your specific preferences, you can opt for a straight bar, an L-shaped bar, or even a curved bar. Think about how many people you’d like to accommodate and how much countertop space you’ll need for preparing drinks and serving guests.
Considering Practical Features
When designing your outdoor bar, it’s essential to consider practical features that will enhance its functionality. One important feature to think about is a sink or a space for a compact fridge to keep your beverages cold and within easy reach. A built-in ice bucket or cooler can also be a great addition for convenience. Additionally, you may want to include a built-in cutting board or bar utensil storage to make drink preparation more efficient. Don’t forget to incorporate a footrest for added comfort and a place to rest your feet while seated at the bar.
Incorporating Storage and Shelving
To maximize both functionality and aesthetic appeal, consider incorporating storage and shelving options into your bar design. Open shelves can provide easy access to frequently used items such as glasses, bottles, and cocktail accessories. If you prefer a more streamlined look, you can opt for cabinets with doors to hide your supplies and equipment. Another creative option is to include a built-in wine rack or wine glass holder to showcase your collection. Make sure to allocate enough space for storage without compromising the overall design or functionality of the bar.
Gathering the Necessary Tools and Materials
Before you can begin building your outdoor bar, it’s important to ensure you have all the necessary tools and materials on hand. This will save you time and frustration during the construction process. Here’s a list of the basic tools you’ll need:

Tools Required
- Measuring tape
- Pencil or marker
- Circular saw or miter saw
- Drill
- Screwdriver (both flathead and Phillips)
- Clamps
- Level
- Sander or sandpaper
- Paintbrushes or paint sprayer
- Safety goggles and gloves
Materials Needed
- Wood planks or boards (based on your design and dimensions)
- Screws and nails
- Wood glue
- Sandpaper (various grits)
- Protective finish (such as sealant or outdoor-rated varnish)
- Paint or stain (if desired)
- Countertop material (such as granite, concrete, or tile)
- Optional features (e.g., footrest, umbrella hole)
Ensure you have all these tools and materials ready to go before diving into the construction process. It’s always best to be prepared and organized to make the building experience smoother and more enjoyable.
Preparing the Wood
Before you can start constructing your bar, it’s important to properly prepare the wood to ensure a smooth and even finish. This involves measuring and cutting the wood to size, as well as sanding and smoothing the surfaces.
Measuring and Cutting the Wood
Using your measuring tape, carefully measure each piece of wood according to your bar design and dimensions. Mark the measurements with a pencil or marker to ensure accuracy. If you’re uncertain about cutting the wood yourself, most home improvement stores offer cutting services where they can cut the wood to your specified measurements. Alternatively, you can use a circular saw or miter saw to cut the wood yourself. Take your time and make precise cuts to avoid any errors.

Sanding and Smoothing the Surfaces
After cutting the wood to size, it’s essential to smooth any rough edges or surfaces using sandpaper or a sander. Start with a coarse-grit sandpaper to remove any splinters, rough spots, or imperfections. Then gradually move on to finer-grit sandpaper to achieve a smooth finish. Pay attention to the corners and edges of the wood, as these areas can be easily overlooked but may affect the overall appearance and safety of your bar. Remember to wear safety goggles and gloves while sanding to protect yourself from any flying debris.
Constructing the Bar Frame
Now that your wood is properly prepared, it’s time to start constructing the frame of your outdoor bar. Building the base structure and attaching the legs and supports are key steps in this process.
Building the Base Structure
Begin by assembling the base structure of your bar. This typically involves attaching the side panels to the front and back panels using screws and wood glue. Ensure that the corners are square and use clamps to hold the pieces together while you attach them. Double-check your measurements and make any necessary adjustments before securing everything in place. Reinforce the joints with additional screws or brackets for added stability.
Attaching the Legs and Supports
Once the base structure is complete, it’s time to attach the legs and supports. Measure and mark the desired height for the bar, then attach the legs to the corners of the base using screws and a drill. Make sure the legs are straight and securely fastened to avoid any wobbling. Additionally, install additional supports or crossbars between the legs for added stability and to prevent sagging. Double-check that everything is level and secure before moving on to the next step.
Installing the Countertop
The countertop is a crucial component of any bar, providing a functional and visually appealing surface for your drinks and entertainment. When installing the countertop for your outdoor bar, there are a few important considerations to keep in mind.

Choosing the Right Countertop Material
One of the first decisions you’ll need to make is choosing the right countertop material for your outdoor bar. Granite, concrete, and tile are popular choices that offer durability and resistance to outdoor conditions. Granite provides a luxurious and timeless look, while concrete offers a more contemporary and versatile option. Tile allows for endless design possibilities with various colors and patterns. Consider the overall style and aesthetic of your outdoor space when selecting the countertop material that best suits your taste.
Cutting and Fitting the Countertop
Once you’ve chosen the countertop material, it’s important to measure and cut it to fit your bar. If you’re working with granite or concrete, it’s best to hire a professional to ensure accurate measurements and a precise cut. For tile countertops, you can purchase individual tiles and cut them to size yourself using a wet saw or tile cutter. It’s essential to make precise cuts to ensure a snug fit and minimize any gaps or uneven edges.
Securing the Countertop to the Frame
After cutting the countertop to size, it’s time to secure it to the frame of your outdoor bar. Depending on the material you’ve chosen, you may need to use adhesive or screws to secure the countertop in place. Follow the manufacturer’s instructions for the specific material to ensure proper installation. Take care to ensure that the countertop is level and centered on the frame to create a professional and polished look. Consider using brackets or additional supports underneath the countertop for added stability and to prevent any sagging or warping over time.
Adding Finishing Touches
To truly make your outdoor bar stand out, it’s important to add those finishing touches that enhance both its appearance and functionality. Finishing touches can include applying a protective finish, adding optional features, and painting or staining the bar.

Applying a Protective Finish
Before using your outdoor bar, it’s crucial to apply a protective finish that will shield the wood from moisture, UV damage, and other outdoor elements. Depending on the type of wood you’ve chosen, it may already have natural resistance to decay and rot. However, a protective finish can further enhance its durability and longevity. Consider using an outdoor-rated sealant or varnish that is designed to withstand the elements. Apply the finish according to the manufacturer’s instructions and allow it to dry thoroughly before using your bar.
Adding Optional Features
To customize your outdoor bar and make it even more functional, you can incorporate optional features based on your preferences and needs. For example, you may want to add a footrest along the front of the bar to provide additional comfort for your guests. Another optional feature could be an umbrella hole in the countertop to provide shade on hot sunny days. Consider these additional features during the design phase of your bar to ensure they are seamlessly integrated into the overall structure.
Painting or Staining the Bar
To enhance the aesthetic appeal of your outdoor bar, you may consider painting or staining the wood. This allows you to match the bar to your existing outdoor decor or create a unique look that reflects your personal style. If you choose to paint the bar, make sure to use an outdoor-rated paint that is designed to withstand the elements. Staining the wood can also be a great option if you want to showcase the natural beauty and grain of the wood while providing a protective layer. Whichever option you choose, prepare the wood surface by sanding it lightly and apply the paint or stain evenly for a professional finish.
Weatherproofing the Bar
To ensure that your outdoor bar withstands the test of time and continues to look its best, it’s important to take steps to weatherproof it. By applying a weather-resistant sealant, protecting against UV damage, and properly covering or storing the bar during inclement weather, you can prolong its lifespan and maintain its appearance.
Applying Weather-Resistant Sealant
As mentioned earlier, applying a protective finish is essential in weatherproofing the wood of your outdoor bar. In addition to protecting against moisture, it’s important to choose a sealant that provides resistance to the sun’s harmful UV rays. UV exposure can cause the wood to fade, discolor, and deteriorate over time. Look for a sealant that specifically mentions UV protection on the label. Apply the sealant according to the manufacturer’s instructions, ensuring that all surfaces of the bar are adequately covered and protected.
Protecting Against UV Damage
In addition to the sealant, there are other steps you can take to protect your outdoor bar from UV damage. Consider placing your bar in a shaded area of your outdoor space, such as under a pergola or umbrella. This can significantly reduce direct exposure to the sun’s rays, minimizing the risk of fading and deterioration. Alternatively, you can invest in a high-quality outdoor cover specifically designed to protect furniture and structures from UV damage. Make sure the cover is the appropriate size for your bar and securely fastened to prevent wind from blowing it off.
Covering or Storing the Bar During Inclement Weather
When severe weather strikes, it’s important to take proactive measures to protect your outdoor bar. High winds, heavy rain, and extreme temperatures can damage or weaken the structure over time. Consider investing in a waterproof cover that can be quickly and easily placed over the bar when inclement weather is imminent. Alternatively, if you have space available, you may choose to disassemble the bar and store it in a protected area such as a garage or shed. This provides the highest level of protection during extreme weather conditions.
Accessorizing the Bar
Now that your outdoor bar is built and weatherproofed, it’s time to turn your attention to the fun part – accessorizing! By choosing suitable bar stools or chairs, adding lighting fixtures, and decorating the bar area, you can create an inviting and stylish space for entertaining and relaxation.
Choosing Suitable Bar Stools or Chairs
When it comes to selecting seating for your outdoor bar, comfort and style are key factors to consider. Look for bar stools or chairs that are specifically designed for outdoor use and can withstand exposure to the elements. Opt for materials that are weather-resistant, such as aluminum, wicker, or teak. Cushioned options provide added comfort, but make sure the cushions are made from weather-resistant materials as well. Consider the height of your bar and choose stools or chairs that allow for comfortable seating and easy access to the bar’s countertop.
Adding Lighting Fixtures
Proper lighting is essential for both functional and aesthetic purposes. Consider adding lighting fixtures to your outdoor bar to create an inviting ambiance and ensure visibility during evening gatherings. String lights or pendant lights can be hung above the bar area to provide gentle illumination. LED lights placed underneath the bar’s countertop can create a sleek and modern look while also providing functional task lighting. Solar-powered lights are a great option for eco-conscious individuals, as they harness the power of the sun and eliminate the need for electrical wiring.
Decorating the Bar Area
To truly personalize your outdoor bar and make it feel like a cohesive part of your outdoor living space, don’t forget to decorate! Add decorative elements that reflect your personal style and enhance the overall atmosphere. Consider hanging artwork or signs that add a touch of personality, such as a vintage-inspired cocktail menu or a humorous bar quote. Incorporate potted plants or flowers for a natural and inviting feel. Choose outdoor-friendly accessories like coasters, drink dispensers, and decorative trays to add practicality and style to your bar area. Finally, don’t be afraid to get creative and add personal touches that make the space feel uniquely yours.
Maintaining and Caring for the Bar
Once your outdoor bar is complete and the accessories are in place, it’s important to implement a regular maintenance routine to keep it looking its best. By following these maintenance tips, you can ensure that your bar remains in top condition for years to come.
Regular Cleaning and Upkeep
Regular cleaning is essential for maintaining the appearance and functionality of your outdoor bar. Remove any debris, dust, or dirt from the surfaces regularly to prevent buildup that can damage the wood or other materials. Use a mild detergent or a specially formulated outdoor cleaner to clean the bar’s surfaces, ensuring that you rinse thoroughly afterwards. Avoid using harsh chemicals or abrasive cleaners that could potentially damage the wood or finish. Additionally, check the hardware regularly to ensure it remains tight and secure, tightening any loose screws or bolts as needed.
Repairing Any Damage
Over time, your outdoor bar may experience wear and tear or minor damage. It’s important to address any issues promptly to prevent further deterioration. Inspect the bar regularly for signs of rot, warping, or insect damage. If you notice any damage, take the necessary steps to repair it. This may involve replacing damaged wood planks, sanding and refinishing sections of the bar, or reinforcing weak joints. Keep an eye out for any loose or damaged hardware and make the necessary repairs to maintain the structural integrity of the bar.
Reapplying Protective Finishes Over Time
As the protective finish on your outdoor bar begins to wear off over time, it’s important to reapply it to maintain the wood’s durability and resistance to the elements. This is typically done every couple of years, but the frequency may vary depending on factors such as climate and sun exposure. Always check the specific instructions of the sealant or varnish you originally used and follow the recommended maintenance schedule. Before applying a new protective coat, make sure to thoroughly clean and dry the bar to ensure proper adhesion and a smooth finish.
By following these maintenance steps and addressing any issues promptly, you can enjoy your outdoor bar for many years to come. Regular maintenance not only helps preserve the bar’s appearance and functionality but also contributes to its longevity and overall value.
In conclusion, building a wooden outdoor bar can be an exciting and rewarding project that enhances your outdoor living space and provides endless opportunities for entertaining and relaxation. By choosing the right wood, designing the bar to meet your needs, gathering the necessary tools and materials, properly preparing the wood, constructing the bar frame, installing the countertop, adding finishing touches, weatherproofing the bar, accessorizing the space, and maintaining and caring for the bar over time, you can create a beautiful and durable outdoor bar that becomes a focal point of outdoor gatherings and memories for years to come. So put on your tool belt, gather your supplies, and let your creativity shine as you embark on this enjoyable DIY project. Cheers to your new outdoor bar!

